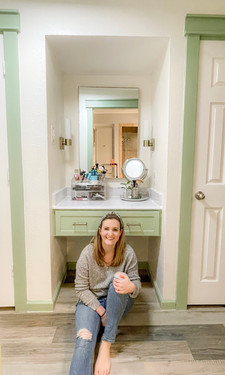
If you've been hanging around here for the past few months, you know that Matt and I moved into a new house at the end of 2020. We bought this house for the floorplan and the backyard, but the cosmetic choices in the house are bad. The folks that renovated this house before chose a weird mix of modern and rustic finishes, so we are going room by room to renovate the home to its former glory.
This house was built in the 70's. While some pieces of the 70s have been removed, there are still a few remnants of outdated 70s finishes that still remain. Especially in the bathroom. Y'all the countertops used in the bathrooms are awful. We are going to redo them eventually, but we are going to have to save up for that. The problem is that part of the bathroom countertops can also be seen in our bedroom with this built-in vanity.
We have a built-in vanity that is in our bedroom hallway. I use it everyday to put on my makeup, and I love the functionality of it. But I hate the way it looks. Check it out.

Bad, right? It has a ton of potential, but the countertops are bad, those lights are outdated, and those drawers need a major facelift. To start this makeover, I began with the countertops.
I am not ready to replace the countertops yet. I am going to wait until we replace the countertops in the bathroom to replace this countertop.
No fear! I found the perfect solution to the countertops. Easy Home Renewals creates countertop covers in different granite and quartz prints. These are great because they are super durable and look just like quartz/granite. The material used for these covers is actually the same material that people use for car wraps. Even better is they are easy to install! When you order from Easy Home Renewals, it comes with a squeegee that makes it easy to get the air bubbles out.
When you are getting ready to install, make sure your countertops are clean. Then in small segments, peel back the sticky part and start laying the countertop cover down. You will want to smooth out the air bubbles as you go. Once the countertop is laid, caulk the corners and edges, and your countertop looks brand new! I used the White Italian Marble countertop cover, and it made such a difference for these countertops!
The second thing I did was replace the vanity lights. I wanted simple lights that were flush the the wall and had a shaded light cover. I found these perfect lights that were affordable and simple from Wayfair.
The last thing I needed to do was replace the drawer fronts. I decided to build these myself since I had leftover plywood in my work shed and leftover paint. I used the 1/2in plywood to create two equal pieces of drawer front that would fit in the vanity. Then I took 1/4in plywood and stripped it into 1 1/2in wide pieces to trim out the drawer fronts. I attached them with brad nails and wood glue. Then replaced the old drawer fronts with these ones! It was easy and made this vanity look like it belonged in this decade. I love how it turned out.
Built-In Vanity Makeover
Do you love it as much as I do? It was such an easy project and made a huge difference in this space. I linked all the products I used above.
Have you used countertop covers like this before?
Caroline
Instagram: @CarolineSearsHome
Pinterest: Caroline Sears Home
This post contains affiliate links


Comments